Tuesday, August 12, 2008

Current Promotions!

As if it weren't enough that we have a NEW Idea Book & Catalog to keep us happy, there is an unprecedented sale going on as well! Stampin' Up! has never put brand new stamp sets on sale... until now! That's right! From now until September 30th, you can choose from a select list of brand new stamp sets and enjoy a 15% savings! Click on the flyer at left for more information!

But that's not all! Stampin' Up! also has an outstanding offer on becoming a Demonstrator! From now until October 11th, in addition to the regular Starter Kit, they now have 3 other kits that focus on different areas... Stamping, Scrapbooking, and Home Decor! You choose the kit that best suits your interests, and each one is only $99 - WOW! Click on the flyer below to view it full size, or visit this link for a text only version. If you prefer, you can still purchase the original kit for $199, and they'll throw in an extra stamp set from the new catalog absolutely FREE!

What a great time to become a Stampin' Up! Demonstrator... and what a great time to take advantage of the Stampin' Up! opportunity! I would love to answer any questions you may have about joining my growing team. There is so much to tell you - I hope you'll ask!

Monday, August 11, 2008

Back to Scrapbooking!

Yes, I know... this is my THIRD post today! But I simply cannot stand to leave you all with a bunch of jabbering (even when it's EXCITING jabbering!) and not show you something I've created! So here is the latest page I've made - and it just so happens to include the word "celebrate" on it, so I think I'll submit this one to Shelli's challenge (found at www.soshelli.com)!

This is a picture of me and my two oldest boys - then just barely 2 and 4. That's Morgan on the left, and Mason on the right. I must say, Morgan looks just like baby Maddox (who happens to be almost 2 himself at the moment)! Just like my earlier pages, this one is for my 6"x6" Favorite Photos album, where all the pictures are black and white. You can view the rest of them at this link.

You can see that I used some of the NEW Bella Rose Designer Series Paper (included in Group 4 in my Paper Share!). As a demonstrator, I was able to preorder this particular pack, and I've been playing with it quite a bit... I must say, I do think that this is my very favorite pack. But who knows, once I get my hands on the other packs, I may say the same thing about them!! There truly is an outstanding selection of DSP in this new catalog! You can also see a few of the new In Colors here - Kiwi Kiss , Riding Hood Red, and Pink Pirouette. If I would've had the textured Pink Pirouette cardstock, I would've used that, but I don't have it... yet. Oh, believe me, it's already on order!!

For the sentiment, I had to force myself not to use the Scallop Circle punch like I always do (love that thing!)... so I used the Key Tag punch instead... L-O-V-E IT! Here's a closer look:

The Rhinestone Brad goes through all layers, except the ribbon. Then I used the Horizontal Slot punch on the ends of the Key Tag so I could thread the Chocolate Chip Wide Grosgrain ribbon through.

Well, I'm still hooked on this little album... can't wait 'til my next page! But I promise I'm done blogging for today. I'll tell you about the current promotions tomorrow. :)

Page Recipe:
Stamp Sets: Sweet Celebrations
Ink: Riding Hood Red, Kiwi Kiss
Cardstock: Chocolate Chip, Pink Pirouette, Riding Hood Red, Whisper White, Kiwi Kiss, Bella Rose DSP
Accessories: Rhinestone Fire Circle brads, Chocolate Chip Wide Grosgrain ribbon
Tools: 1-3/8", 1-1/4", 1/2", and 1/16" Circle punches, Word Window punch, Tag Corner punch, Key Tag punch, Scallop Edge punch, Horizontal Slot punch

August Paper Share!

A brand new Idea Book & Catalog means it’s time to sample some paper... the new Designer Series Paper, that is! Here are the details on my new Paper Share:

There are 5 different groups to choose from. Each group has 48 double-sided 6" x 6" sheets - that's 2 squares of each sheet from 4 different designer packs. You can view these patterns by looking at pages 168-171 in the new Fall/Winter 2008 Idea Book & Catalog. You may participate in as many groups as you’d like. The prices listed below include Priority shipping and tax, and as you’ll see, the more groups you participate in, the more you’ll save! Plus, there’s an added bonus if you participate in all 5 groups! I accept payment via PayPal and will send an invoice upon receipt of your order. This share is open to anyone in the US!

Group
1

Hawaii Papaya, Washington Apple,
Georgia Peach, Maine Blueberry

Group
2

Muirfield, Manchester,
Prestwick, Windsor Knot

Group
3

Summer Picnic, Junior Varsity,
Ghostly Greetings, Rainbow Sherbet

Group
4

Bella Rose, Holiday Treasures,
Banbury, Parisian Summer

Group
5

Haiku, Urban Garden,
Green Tea, Sweet Always


PRICING:
Basically, the first group is $15, and then the price drops $1 for each additional group you purchase, so by the 5th group, you're only paying $11! Here’s the breakdown, including your savings if you were to purchase the equivalent amount of FULL packs - what you pay is in red.

Cost per
Group

Your Total
Cost

Cost if purchased
FULL packs

(shipping & tax
not incl)

SAVINGS!

1st
(sample 4 packs)

$15

$15

$47.39

$32.39

2nd
(sample 8 packs)

$14

$29

$94.78

$65.78

3rd
(sample 12 packs)

$13

$42

$142.18

$100.18

4th
(sample 16 packs)

$12

$54

$189.57

$135.57

5th
(sample all 20 packs)

$11

$65

$236.96

$171.96


BONUS!
If you participate in ALL 5 groups, I’ll toss in a Classic Ink Pad (your choice of color) absolutely FREE! Indicate the color you’d like when placing your Paper Share order!

Please contact me with your order, and feel free to ask any questions you may have. I will be placing this order on August 26th, so please have your order in by August 25th!

Stay tuned - my next post will have a NEW Scrapbook page I've made for my 6"x6" Favorite Photos Album... remember that?! (visit this link for a reminder) It's been awhile, but now that we have beautiful new DSPs to play with, I decided to get back to work on it!

Welcoming a NEW Idea Book & Catalog!

The day has come! The new Fall-Winter 2008 Idea Book & Catalog is here!

Click on the image above to view it online!

The release of this new catalog means the release of many, many great things. Not only do we have a fresh new supply of stamp sets and accessories, but we get a new collection of In Colors Pacific Point, Baja Breeze, Kiwi Kiss, Riding Hood Red, Pink Pirouette, and Tangerine Tango... I am more excited about this set of In Colors than any of the previous ones! They are simply gorgeous!

Let me fill you in on some of my favorite newest accessories (this list is NOT exhaustive!):

DescriptionItem #Page #Price
Flower Fusion Too
in 3 new colors
#112006182$14.95
Designer Brads,
4 new styles
varies184$5.95 ea
Hodgepodge Hardware
in Styled Vanilla
112454185$29.95
Designer Buttons
in 4 of the In Colors
112092187$7.95
Wide Oval
punch
112082188$15.95
Scallop Edge
punch
112091188$15.95
1-3/4” Circle
punch
112004188$15.95
Scallop Square
punch
112081188$15.95

Again, that is not a complete list - just some of my favorites. And that doesn't even mention all of the NEW Ribbon – pgs. 186-187. Be sure to visit my Ribbon Share post to learn how you can sample it all!

And finally, you simply MUST check out all of the fabulous new Designer Series Papers (DSP) on pgs 168-171!! Oh, my word! I love them all! And to help all of you sample all of it, I’m doing another Paper Share! Yippee!

In addition to all of this great stuff, there are several new promotions that begin today as well! I will be updating my sidebar with information, and I will detail each of them individually in the next few posts. But I'll leave you for now so you can spend some time compiling your wish lists!

Saturday, August 9, 2008

Celebrate Your Life!

I am very excited about Shelli's new blog! For those of you who have not heard, our very own Shelli Gardner (Co-Founder and CEO of Stampin' Up!) has decided to enter the blogging world and her new blog debuted earlier this week. You can find it at www.soshelli.com. In addition to sharing a part of her world with us, she will also post periodic creative challenges that we can participate in! I've decided to enter her first one (create something with the word "Celebrate" in it), and here is the card I made:

I had a great time with this card! Of course, the family across the bottom (stamped with the All in the Family stamp set) represents me and all the wonderful men in my life... my husband and three sons. In order to line them all up properly, I had to get real friendly with my Stamp-a-ma-jig , as you can imagine! (Be sure and visit my Stamp-a-ma-jig tutorial for a quick lesson in how to use this incredible tool!) I also decided to showcase some of the new Pacific Point and Kiwi Kiss In Colors - available to you on August 11th! And check out that GORGEOUS new Pacific Point Striped Grosgrain ribbon!! Isn't it fabulous?! ...and if you've been keeping up with my blog, you know that this ribbon is included in my August Ribbon Share! We got a little bit of it at Convention (yippee!), so I thought I'd give you another sneak peek!

For the sentiment, I used A Little Birthday Cheer and Define Your Life, inking up only the words I wanted using my Stampin' Write markers.

I think this card front would also look darling in a simple frame to keep on my desk - or my husband's - as a reminder of what is truly the most important part of our lives. I hope you've enjoyed it as well!

Full Recipe:
Stamp Sets: All in the Family, A Little Birthday Cheer, Define Your Life
Ink: Black StazOn, Pacific Point, Ruby Red, Old Olive, Pumpkin Pie, Close to Cocoa, Chocolate Chip, Going Gray
Cardstock: Kiwi Kiss, Pacific Point, Whisper White
Accessories: Pacific Point Striped Grosgrain Ribbon, Dimensionals, Glue Dots
Tools: Word Window punch, Scallop Circle punch, 1-3/8", 1-1/4", and 1/16" Circle punches, Stamp-a-ma-jig

Friday, August 8, 2008

Check Out THIS Opportunity!!

Oh My GOODNESS!!! You will not BELIEVE how easy and affordable it's going to be to join this fantastic Stampin' Up! family! We have just been informed of a new promotion for all of you who want to get in on the action, but want to do it for LESS! Starting this Monday, for a limited time only, there will be 4 different Starter Kits to choose from - and three of them are ONLY $99! That's $100 LESS than the regular kit!

I can't show you the flyer just yet - it will be released on August 11th... hmmmm, that's going to be a BIG day! But I wanted to give you a heads up so you could start asking me your questions now!

Soooo, if you have questions about becoming a demonstrator, please feel free to contact me directly. I'm always looking for more Stampin' Up! enthusiasts to join my growing team! I will share more details on Monday - both on my blog and in my newsletter (subscribe now if you haven't already!).

Woohoo! I can't wait to talk with you more about this incredible opportunity!

Thursday, August 7, 2008

Did Someone Ask for YoYo Yellow?

The Skool Teacher is still MIA - but I know she'll turn up eventually as she's the winner of my earlier blog candy! And I do intend to make a card using the More Mustard that she has trouble with. But since I haven't heard from her yet, I thought I'd take an opportunity to offer a suggestion on the #1 listed color challenge - YoYo Yellow! It seems that so many of you have a hard time with this color, so I made it a priority to make something with it as soon as possible.

I will start by admitting that this is probably my least used color as well. I'm not much for bold and bright colors in general, but when I do use them, I never let them overwhelm my cards. I usually only use splashes to brighten up the look. Here, as you can see, I used a YoYo Yellow base, but toned it down by adding a layer of Close to Cocoa and some Pumpkin Pie from the Jersey Shore DSP. I think those colors are also appropriate since I'm using a giraffe here! And because I intend to give this to a darling little girl (I won't mention who in case she sees this before it arrives!), I decided to add a little bit of bling as shown below:

These are some Fire Circle Rhinestone Brads... there's one in the sentiment as well. Aren't they cute? I'd say this giraffe is STYLIN'...

I will work on some other cards with this difficult color, as it is my aim to make those of you who are as challenged as I am in the YoYo Yellow department go "Ahhhhhh! Now I LIKE it!" Just let me know when I hit the winning look! :)

Recipe:
Stamp Set: Wild About You
Ink: YoYo Yellow, Pumpkin Pie, Chocolate Chip
Cardstock: YoYo Yellow, Close to Cocoa, Pumpkin Pie, Jersey Shore DSP, Whisper White
Accessories: Chocolate Chip Wide Grosgrain ribbon, Fire Circle Rhinestone Brads
Tools: Large Oval punch, Dimensionals

...Trying to Reach You!

This is just a quick post to let a couple of you know that I have been trying to respond to your e-mail messages to answer your various questions, and because the conversation gets left hanging at that point, I'm wondering if my messages got directed into your Spam folders. Darlene... Amy... I have been trying to reach you in response to your inquiries! Check your Spam/Junk folders. If that doesn't work, you can e-mail me your phone number and I'd be happy to give you a personal call.

This goes for anyone... I am extremely diligent about responding to e-mail, and I usually do it within a couple hours or less. If you have ever sent me an e-mail where you expected a reply and didn't receive one, please try checking Spam/Junk. If I'm not in there, send me another e-mail indicating that you haven't heard from me... and consider leaving your phone number. I WILL get in touch with you!! I've even used my old Hotmail address to reach someone (Hi Michelle) before.

Know that EVERY e-mail is important to me - and so are YOU!

Tuesday, August 5, 2008

August Ribbon Share!

Yes, it's time for the August Ribbon Share! And this month it will be EXTRA special in that it will contain all of the NEW ribbon featured in the upcoming Idea Book & Catalog (to be released on August 11th)! Every month I get asked how a Ribbon Share works, so let me answer that right here: It's simple. I order entire spools of ribbon and divide it up (along with the cost) between 5 individuals. I normally have SEVERAL groups of 5 each month, and you can even choose to take up 2 spots if you'd like to - just double the costs listed below. Participation is on a month-by-month basis - you join only the groups you are interested in. I do all the work... I measure and cut the ribbon, bag it all in individual bags, and mail it to you. The prices listed below include everything - shipping and tax. Anyone in the US can participate - demonstrator or not! (it's actually a great thing for demonstrators...)

I got to see all of the new ribbons - and even work with some of it - at Convention, and here's a teaser card that uses the new 1-1/4" Pink Pirouette Grosgrain ribbon:

Isn't it darling? We actually made this adorable pink ribbon flower in one of our Make and Take classes. The ribbon is simply threaded down one edge with some Linen Thread, and then gathered into a circle - easy-peasy! But at convention, they added some silver chunky glitter around the edges and used a Rub-on in the center... I preferred mine softer, so I left those parts off and brought the flower home plain to embellish my way and create my own card!

There are several new items on this card... let me point them out. First, it uses the new Riding Hood Red In Color as the base. Second, it uses a sentiment and small flower from the new Flight of the Butterfly set (which we all got for FREE at Convention!). Third, it uses one of our new Riding Hood Red Designer Buttons. Fourth, it has our beautiful new Bella Rose DSP. Fifth, it uses the new Scallop Edge punch across the Whisper White - no more using the corner rounder to do this, whoopee! And lastly, as I mentioned, this flower is made with the new 1-1/4" Pink Pirouette Grosgrain ribbon! So since this ribbon will be included in the August Ribbon Share, let me share with you all the OTHER new ribbons! (Keep in mind that you will be able to view these ribbons on pages 186-187 of the new catalog once it's released on August 11th - I am not allowed to reproduce it at this time, but I will make a hot link once I am able to.)

The August Ribbon Share will be broken into two separate groups and will consist of the following:

GROUP 1: (Standard colors only)
3 yards each of the 4 new colors of 1/4" Grosgrain:
Rose Red, Sage Shadow, Old Olive, and Chocolate Chip.

2 yards each of the new 1" Double Stitched Grosgrain:
Rose Red, Bashful Blue, and Chocolate Chip.

2 yards of the new 7/8" So Saffron Poly Twill.

GROUP 2: (In Colors only)
2 yards each of the new Baja Breeze 1" Double Stitched Grosgrain.

2 yards of the new 1-1/4" Pink Pirouette Grosgrain (shown in the card above).

3 yards each of the new 5/8" Striped Grosgrain in the new In Colors:
Riding Hood Red, Pink Pirouette, Baja Breeze, Pacific Point, Kiwi Kiss, and Tangerine Tango.

2 yards of the Kiwi/Vanilla Satin.

2 yards of the new Riding Hood Red Taffeta.

PRICE (includes shipping and tax):
Group 1: $16.00
Group 2: $25.00
Buy BOTH & Save: $38.50

Remember, anyone in the US can participate - demo or not! If you are interested in joining this share, I will need to know NO LATER than August 16th as I will place the order on the 17th. Once I hear which group(s) you'd like, I can send you a PayPal invoice.

What better way to have all the great NEW ribbons without spending a fortune? To put this into perspective, if you were to order a spool of every new ribbon that's being released on August 11th, you would spend around $175 (depending on your local sales tax)! Sample ALL of it with me and save over $135! I hope you'll join us - and as always, I appreciate testimonial comments from my past Ribbon Share participants!

Full Recipe:
Stamps: Flight of the Butterfly (NEW!)
Ink: Riding Hood Red (NEW!), Versamark
Cardstock: Riding Hood Red (NEW!), Whisper White, Bella Rose DSP (NEW!)
Accessories: 1-1/4" Pink Pirouette Grosgrain ribbon (NEW!), Pretties Kit, Designer Button (NEW!), Linen Thread
Tools: Scallop Edge punch (NEW!), 1/16" Circle punch, Crafter's Toolkit (for needle)

Monday, August 4, 2008

Blog Candy Winner!

It's time to announce the winner of my 100,000 hit Blog Candy! I used a Random Number Generator and it gave me the number 23! Here is the lucky winner:

Skool Teacher
More Mustard is the hardest color for me!!! I just can't seem to make it look good.


I could not find a way to get in touch with you as your profile does not have an e-mail address or a name, so I hope you are checking back here!! Please contact me with your mailing information so I can get these things on their way to you!

Thanks again, everyone, for your wonderful support! I look forward to making a More Mustard card that will help the Skool Teacher... and who knows, maybe I can create a couple cards with some of the other "difficult" combinations I heard about! (YoYo Yellow seems to prove challenging to so many of you... I'll see if I can't come up with something you might like.)

Enjoy the rest of your week!

PS: Just a quick sneak peek at August's Ribbon Share - I will be doing all of the NEW ribbon that is in the new catalog! Stay tuned for more details...

Roommate Gifts

I had a wonderful roommate at convention... some of you may know her, as she is another extremely talented stamper/blogger: Jackie Wright, from New York!

This is us on a tour of the beautiful Riverton, Utah Stampin' Up! headquarters. I know she may not like this photo since she has her glasses on, but I think it's cute! We certainly had a great time together! And as tradition holds, we exchanged roommate gifts... You can view the wonderful gift she gave me at this post. It was brilliant!! I tucked my business receipts in there and even got a nice list going of some new contacts I made.

And, as every convention attender needs a notebook... here is what I made for Jackie:

This is a simple marble composition notebook (those black and white ones) that I covered with two different patterns in the NEW Bella Rose DSP - this is definitely one of my favorite new DSPs... I even bought a new Stampin' Up! apron at convention made with this flowery pattern! I stamped a flower from Pretty Peony, cut it out, and adhered it directly to the front of the notebook. This is a gorgeous set that makes beautiful flowers - don't forget that my August Stamp-a-Stack features it as well! The sentiment comes from the NEW Heard From the Heart, which is going to be one of my favorites to use - I love the combination of cursive and print. Then I finished it off with some Old Olive Wide Grosgrain ribbon.

I also made Jackie a matching box that she can put on her desk to hold pens/pencils/scissors:

Again, it uses the Bella Rose DSP, Pretty Peony, and Old Olive Wide Grosgrain, but I also added a couple of Ruby Red brads and this sentiment comes from one of the NEW Level III Hostess sets called Happiness Always. If you like this box, you can see some of my others here, here, here, and here.

My next post will be announcing the winner of the Blog Candy - and since the comments are still trickling in, I will cut the time off at 8pm tonight (Central time) and announce the winner after that! Good luck!

Sunday, August 3, 2008

I'm Home From Convention!

HI EVERYONE!! I just got home from Stampin' Up!'s FABULOUS 20th Anniversary Convention and I can't wait to start sharing with you all the wonderful things I learned while I was there. I will say right now that it solidified in my mind that I work for the BEST company in the world!! I cannot reiterate enough how honored I am to be associated with them. Over the last few days I experienced the excitement of new announcements, wonderful classes, brilliant demonstrations, an incredible CEO (Shelli), generous charitable donations, fun make-and-takes, a wonderful roommate (Hi, Jackie!), and the FABULOUS NEW CATALOG!!! Oh, and how could I forget to mention FREE STAMPS!! Being a demonstrator certainly has its perks!

It is late, I miss my family, so I won't make this long. I just wanted to thank all of you for leaving me such wonderful comments on my 100,000 Hit Blog Candy post! You are all so kind! But how come it takes blog candy to bring you all out?? I'm lucky if I get around 4-6 comments on any given post, but as of now, I have 89 on that one!? :) Hmmmmmm.... In any case, I will be doing the drawing for that candy tomorrow (Monday) afternoon, so if you haven't put your comment in, be sure to do so... and please read the post so you know what you're supposed to put in the comment!

Okay, I'm gonna go hug my kids again... I'll be in touch with you all soon!

Faux Tearing Tutorial


To create this project, you need the supplies shown here (and listed below):

  •  8.5" x 5.5" piece of Soft Sky cardstock, scored at 4.25" 
  • 1.5" x 3" piece of Natural Ivory cardstock
  • 1.75" x 3.25"  piece of Blue Bayou cardstock
  • 16" piece of River Rock double stitched ribbon
  • Garden Whimsy stamp set
  • Paisley background stamp
  • Blue Bayou and Mellow Moss classic ink pads
  • Brayer
  • Stampin' Dimensionals
  • Dauber
  • A piece of scrap paper (not shown)
  • SNAIL adhesive (not shown)
To start, fold your Soft Sky cardstock in half.  Then take your scrap paper (I just use copy paper) and tear it lengthwise.  Strive for a nice wavy tear and then lay it over your folded card as shown below (the folded edge is the part showing).
Now we'll ink up your Paisley background stamp using the brayer.  Alternatively, you could ink up the stamp directly with the ink pad, but I find that the brayer does a fabulous job of getting a nice, even coverage which makes for a beautifully stamped background.  To use the brayer, simply roll it over the Blue Bayou ink pad several times until the roller is completely covered with ink. 
Then roll the brayer over the rubber on your stamp going both directions until the entire stamp is covered.
Normally, I leave my background stamps on the table and press the card on top of the rubber so I can rub the paper and get a great impression.  But that won't work on this card since we have it masked off with our torn paper.  So carefully lift up your inked stamp and line it up to press onto your masked card.  You'll have to be careful to get the entire card covered, so peek underneath the stamp to see the edge of the rubber as you place it down.  I've been too fast with this before and upon lifting it back up, noticed I missed a bit of the edge -- that's okay... I just trimmed the uninked part off and it was just a slightly more narrow card!
When you place your stamp onto the card, please be sure to press evenly all over so you're sure to get a nice impression.
And this is what you'll have when you lift it up!
Now, to make the darker edge, simply slide the masked paper over to the right just a bit like this:
Now for my favorite part!  Take your dauber and dab it on your Blue Bayou ink pad.   With a gentle rubbing motion, sweep your inked dauber across the uninked part of the card, being careful to hold your scrap paper in place. 
When you've finished and removed the scrap paper, you will have a gorgeous faux torn edge like this:
Now add the sentiment of your choice.  Mine is from the Garden Whimsy set and inked in Blue Bayou.
I used a 16" piece of River Rock double stitched ribbon and tied it all the way around the front of the card like this:
For the flower, I used the tulip from the Garden Whimsy set.  To make it two different colors (the flower Blue Bayou and the stem & leaves Mellow Moss), I would normally use my markers.  But since there aren't markers in the In Colors, I just used the stamp pads themselves.  With this tulip stamp, it's pretty easy to get the flower bulb one color and the stem & leaves another.  You just have to peek in there and make sure the edge of your ink pad is stopping at the edge of the tulip bulb.  Then do the same with the Mellow Moss on the stem and leaves.
Since you took time to ink this one up, before you stamp it, it's a good idea to "huff" on the rubber (breathe on it as if you are fogging up a window) to re-moisten the ink.  Stamp it onto your Natural Ivory and layer that onto the Blue Bayou like this:
Attach this to your card with Stampin' Dimensionals and you're finished!
I hope you enjoy this technique as much as I do! 

Friday, August 1, 2008

August Stamp-a-Stack Cards!

Coming at you from Stampin' Up!'s fabulous demonstrator Convention here in beautiful Salt Lake City!! (well, actually, I knew I'd be too busy to write a post like this while I'm here, so I actually wrote this back in Texas before I left *giggle*). It's the start of another new month! And that means I have 3 more Stamp-a-Stack cards to show you! I hope you've forgiven me for not doing a Stamp-a-Stack last month due to all of my houseguests and what-not. Perhaps this month's cards will make it up to you - I'm quite pleased with them!

But first, here's the scoop on this month's workshop: It will be held on Saturday, August 16th from 10am until noon. We will make a total of 12 cards (4 each of 3 different layouts) using my supplies and ink - all I ask that you bring is SNAIL-type adhesive. The cost is just $10 with a $15 minimum order, or $20 without an order. Clear envelopes are provided at no additional charge, or you can choose to purchase coordinating paper envelopes that you can stamp to match the cards. Those are $0.20 cents each.

As always, if you either cannot make that date, or do not live in this area, you can choose to receive a Mail-a-Stack kit. The kit contains all the pre-cut and scored consumable supplies necessary to make the same 12 cards using your own stamps, ink, and tools. It also contains my popular Instruction Sheets on each card, detaling the dimensions, supply lists, step-by-step instructions, and color photographs. The cost for this option is $18 for local pickup, or $22.80 if Priority Shipping is needed.

Either way, you will need to contact me to reserve your seat/kit no later than Thursday, August 14th!

Okay... enough of that! Now onto the cards! I've got several new things to show you this month - some of the new In Colors, as well as a couple new stamp sets! This first layout uses the fun new set called Sock Monkey! We'll be doing two in Ruby Red and two in So Saffron, as shown below.

Although the colors are set, you can choose to mix & match the balloon & banana however you'd like. The set also comes with some other accessories that you can choose to use as well. Here's a closer look at the two I made:


For the second layout, I've used the gorgeous new Pacific Point cardstock - Oh, I just love, Love, LOVE this color!
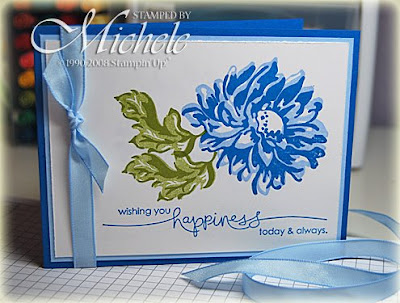
I've paired it up with Bashful Blue on this card, and I think the combination is just stunning. This 2-step stamp set is called Pretty Peony, and I will show you how to get a perfect impression each time using the Stamp-a-ma-jig (or you can have a peek at this tool now by visiting my online Stamp-a-ma-jig Tutorial)! The sentiment here comes from another new set called Heard from the Heart. I love the combination of the block letters with the cursive!

Finally, this third layout uses some more of the new In Colors - Pink Pirouette, Riding Hood Red, and Tangerine Tango (which I've paired up with Apricot Appeal).

The pink card is actually the card I'm using as my swap here at Convention! It's a fun, yet simple card to make, so I thought I'd share it with everyone! The stamp sets here are Sweet Celebrations and Short & Sweet. Here are these two cards individually:


Well, what do you think?! Again, if you'd like to attend the workshop on the 16th or receive the Mail-a-Stack kit, be sure to let me know no later than Thursday, August 14th!

I'll catch up with you again when I return to Texas early next week... have a great weekend!